 darbylanefurniture.com Interior design ideas with the latest interior inspiration

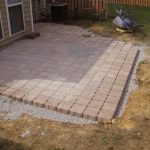
Paver stones are a popular choice for creating beautiful and durable outdoor spaces such as patios, walkways, and driveways. Installing paver stones is a DIY project that can add value and curb appeal to your home, but it can be a daunting task for beginners. With the right tools and techniques, you can create a professional-looking paver stone installation that will last for years to come. Here are five essential tips for installing paver stones like a pro.
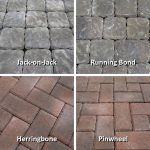
1. Plan and Prepare Before you start your paver stone installation, it’s important to plan out the layout of your project and gather all the necessary materials and tools. Make sure to measure the area where you will be installing the paver stones and calculate how many stones you will need. You should also mark out the area with string or chalk so you have a clear idea of where each stone will go. Additionally, make sure the ground is level and compacted before you start laying the stones.
2. Choose the Right Base The key to a successful paver stone installation is a solid base. The base provides support and stability for the stones and helps prevent them from shifting or sinking over time. There are a few different options for bases, including sand, gravel, and concrete. Sand is the most commonly used base for paver stone installations because it allows for some flexibility and drainage. Make sure to compact the base thoroughly before laying the stones to ensure a level surface.
3. Start from the Center When laying your paver stones, start from the center of your project and work your way outwards. This will help you maintain a consistent pattern and ensure that your stones are evenly spaced. Use a rubber mallet to tap each stone into place and make sure they are level with each other. It’s important to leave a small gap between each stone for jointing sand, which helps lock the stones in place and prevent weeds from growing between them.
4. Cut and Trim as Needed Inevitably, you will need to cut some paver stones to fit around corners or obstacles in your project. To do this, use a saw with a diamond blade or a chisel and hammer to carefully cut the stones to size. Make sure to wear safety goggles and gloves while cutting the stones and take your time to ensure a clean and precise cut. For curved edges or corners, consider using flexible paver edging to create smooth, uniform curves.
5. Finish with Jointing Sand Once all of your paver stones are in place, it’s time to fill in the gaps with jointing sand. This sand helps lock the stones in place and prevent them from shifting over time. Use a broom to sweep the sand into the gaps between the stones and then use a compactor to firmly pack the sand down. Add more sand as needed until all the gaps are filled and the stones are secure.
By following these essential tips, you can create a professional-looking paver stone installation that will enhance the beauty and functionality of your outdoor space. With proper planning, preparation, and attention to detail, you can achieve a durable and long-lasting result that will be the envy of your neighbors.