 darbylanefurniture.com Interior design ideas with the latest interior inspiration

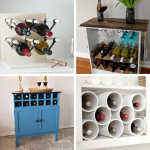
When it comes to home décor, a stylish wine rack can add a touch of elegance and sophistication to any room. Whether you are a wine connoisseur or just enjoy the occasional glass with dinner, having a designated place to store your bottles can not only free up cabinet space but also make a bold statement in your home.
Building your own wine rack at home is a fun and rewarding project that can be customized to fit your personal style and space requirements. With a few simple tools and materials, you can create a unique and functional wine rack that will impress your guests and showcase your collection of wine bottles.
Here is a step-by-step guide on how to build your own stylish wine rack at home:
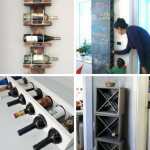
1. Gather your materials: You will need wood boards, a saw, sandpaper, wood glue, screws, a drill, a tape measure, a pencil, and a level. Choose a type of wood that complements the décor of your home and is sturdy enough to hold the weight of the wine bottles.
2. Measure and cut the wood: Determine the size of your wine rack based on the number of bottles you want to store and the available space in your home. Use a saw to cut the wood boards to the desired dimensions, making sure to cut the sides, top, and bottom pieces evenly.
3. Sand the edges: Use sandpaper to smooth out the rough edges of the wood boards, creating a clean and polished look for your wine rack.
4. Assemble the wine rack: Begin by attaching the sides of the wine rack to the top and bottom pieces using wood glue and screws. Make sure the pieces are lined up evenly and securely fastened together.
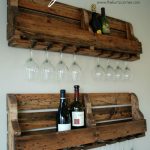
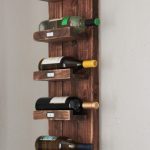
5. Add the wine bottle holders: Measure and mark the spacing for the wine bottle holders on the top piece of the wine rack. Use a drill to create holes for the wine bottles to sit in, making sure they are evenly spaced and large enough to hold the bottles securely.
6. Secure the wine bottle holders: Place the wine bottles in the holes you created and make any adjustments needed to ensure a snug fit. You can also add additional supports or dividers to prevent the bottles from rolling or tipping over.
7. Hang or display your wine rack: Once your wine rack is complete, decide on the best placement in your home. You can hang it on the wall, place it on a countertop, or even mount it under a cabinet for a space-saving solution.
Building your own stylish wine rack at home is a fun and creative project that can enhance the look and functionality of your space. With a little time and effort, you can create a beautiful and functional piece that will showcase your love of wine and impress your friends and family. Cheers to DIY projects and enjoying a good glass of wine in style!