 darbylanefurniture.com Interior design ideas with the latest interior inspiration

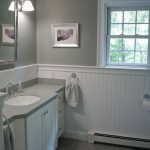
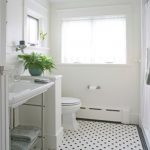
Are you tired of your boring bathroom? Do you want to give it a fresh new look without breaking the bank? One easy and affordable way to transform your bathroom is by installing bead board paneling. Bead board is a type of wall paneling made of narrow wood planks that are lined up vertically with a small ridge, or bead, in between each plank. Installing bead board in your bathroom can instantly add charm and character to the space, giving it a cozy and inviting feel. In this article, we will provide you with a step-by-step guide on how to transform your bathroom with bead board.
Step 1: Measure and plan
The first step in installing bead board in your bathroom is to measure the walls where you want to install the paneling. Measure both the height and width of the walls so you can determine how much bead board you will need. It’s also important to take into consideration any obstacles such as outlets and pipes that may affect the installation process.
Once you have your measurements, you can start planning the layout of the bead board. Decide whether you want to install the paneling on just one wall as an accent, or if you want to cover all of the walls in the bathroom. You can also choose to install the bead board halfway up the wall and paint the upper half a different color for a two-tone effect.
Step 2: Prepare the walls
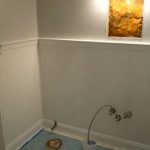
Before you can start installing the bead board, you will need to prepare the walls by removing any existing trim or molding. You may also need to patch any holes or imperfections in the walls and sand them smooth. If your walls are painted or wallpapered, you will need to remove the finish so the bead board can be installed properly.
Step 3: Install the bead board
Once the walls are prepped and ready, you can start installing the bead board. Begin by measuring and cutting the panels to fit the height of the walls. Apply construction adhesive to the back of each panel and press it firmly against the wall. Use finishing nails to secure the panel in place, making sure to nail into the studs for added support. Repeat this process for each panel until the walls are covered.
Step 4: Finish the edges
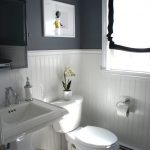
To give your bead board a polished look, you will need to finish the edges with trim. Measure and cut the trim pieces to fit around the edges of the panels and secure them in place with finishing nails. You can also add chair rail molding to the top of the bead board for a decorative touch.
Step 5: Paint or stain
Once the bead board is installed and trimmed, you can paint or stain it to match the rest of the bathroom decor. Bead board can be painted in any color you desire, or left natural for a rustic look. Make sure to use a high-quality paint or stain that is moisture-resistant, as bathrooms can be prone to humidity and moisture.
Transforming your bathroom with bead board is a simple and budget-friendly way to update the space and give it a fresh new look. Follow this step-by-step guide to install bead board in your bathroom and enjoy the cozy and inviting atmosphere it creates.